Navigation Topics Tutorials Others Contact |
Access - FormsIntroduction
Possibilities from the toolbar |
|
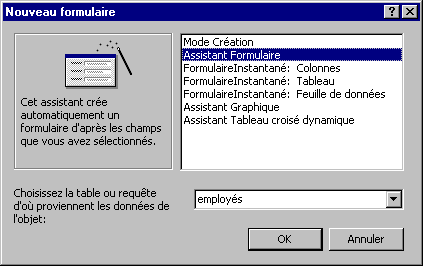
IntroductionForms are used to present the data in a better way. It's also a "friendlier" or practical way to enter or modify the data in a form than directly in a table or a query. So, it's possible only to show only the fields that are necessary on the screen. It's also possible "to lock" a field. This allows to the user of the form to see the contents of a field but not to change it. As for a query, you may have calculated fields to carry out calculations such as for subtotals or taxes. The list of the functions that Access can carry out is much more than just simple calculations. The creation of a form requires a table or a query as the source for it. A query is more practical when you need a form with fields of that comes from several tables. It's also more practical if you want to filter the records so to see only the records that answers your criteria. The exercises on the various elements, controls in Access speak, and the functions of a form will be demonstrated from the table Employees. Copy the database that contains this table, and several others, click here to return you to the demonstrations files Web page and copy the file demoacc2.mdb on your floppy disk. For those that use the use Netscape to see these pages, read the carefuly the note at the bottom of the page and copy the file demoacc2.exe. For those that use Access 2000, copy the file demoa2k2.exe from the same Web page. When you'll have copied the right file, return to this page to continue learning. Create of a form with the help of the assistantYou can create a form from scartch. But it's more advantageous to use one of the wizards that Access puts at your disposal to realize a form. You can always modify it afterward according to your needs. You can create a form with no field. But, the "source" of a form can be a table or a query. However, a query can have several tables. So, you can have a "complex" form that uses the data of several tables at the same time. It's however necessary to verify these queries are " in good working order" before creating a form based on these. The rule is that, if you're capable of entering of the data directly from the query, you'll be also capable of making the same in the form.
Access shows you the list of the available wizards for the creation of a form. As you can see, there are several choices. The table below describes each of these wizards as well as the advantages and the disadvantages of each.
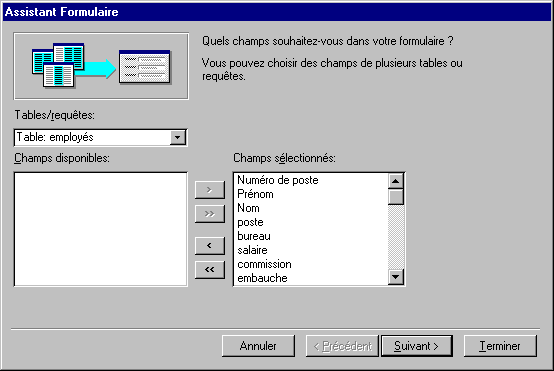
The next window consists in determining the fields that you'll need in the form. At the foot of the window, this one is separated in two parts. The left box shows the fields of the table or the query. The right box shows the list of the fields that will be used in the form. To add a field:
The field will be added to the list of fields selected for the form.
The order in that you select fields is important. It's in this order that these fields will appear on the form. You can always change it by personalizing the form. But, you can also avoid this by placing in order fields at the start.
The assistant allows you to choose fields resulting from several tables or from queries without before having to create a query having all the wanted fields. It's however necessary to pay attention to have made the permanent relations between tables before choosing fields of various tables or queries. So, the form will show all the records. If you need to show or to reach that in a part of the records or that there are no relations between tables or queries of that you need, you should before create a query.
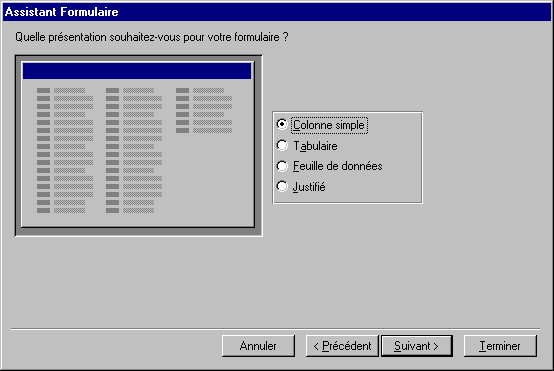
The next screen asks that is the way that fields will be shown in the screen. Access gives you even a preview of your choice to the left of the window before choosing definitively. The simple Column option will show fields one below another. The Tabular option will show fields one next to another. Access will reduce the size of fields to make sure that fields appear the one in quoted(esteemed) by another. The data sheet option will show the fields the same way as the data entry of a table. This is not practical if the user does not know all the fields. The Justified mode will show fields the one in quoted(esteemed) by another without it will not reduce the size of fields. It's going to show the other fields down. The left part of the window gives you an picture of the type of presentation.
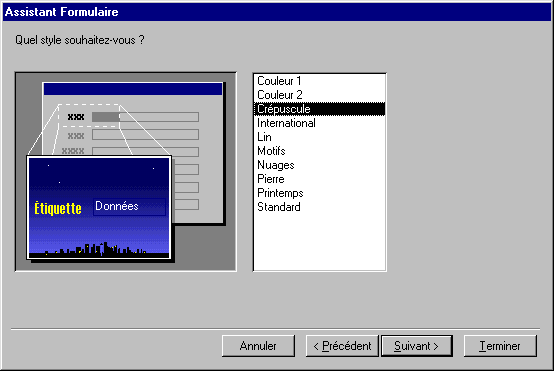
The next window asks you that is the thorough picture of your form. You can decide not to put a bottom of form by selecting the Standard option.
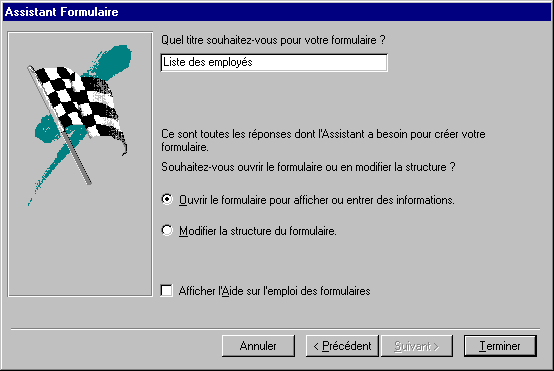
The last window asks you first for the title of the form.
Access will asks for to you what you want to do. You can see the form or modify the form at once.
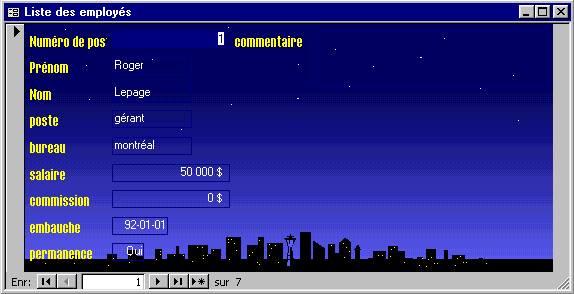
Here is a preview of the form once completed.
Entering dataIt's now possible for you to add or to change the records of the table as you have it sheet of data during the creation of the table can be made in mode. However, the presentation of the data is more understandable for a new user than by using the data sheet mode. Moving inside the formTo move in the form, use the following the keys:
Changing a recordIt's very easy to change the contents of a field if this one is not "locked".
Delete a record
|
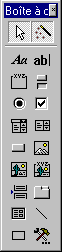 |
The toolbar offers you the access to several controls that you can add to your form. The next part explains each of these tools and gives an example of the functioning of each in a form. |
select a control 
While pressing on the button ![]() ,
you may you to select one or several controls (objects) to move them
then or change one of their properties.
,
you may you to select one or several controls (objects) to move them
then or change one of their properties.
Activate the wizards 
![]() This option
allows you to activate or not the wizards for the various controls of the
toolbar. leave the "active" wizards. This will help you during the
addition of certain controls in your form.
This option
allows you to activate or not the wizards for the various controls of the
toolbar. leave the "active" wizards. This will help you during the
addition of certain controls in your form.
Add a "title" or a free text. 
So formerly being called labels, they serve for describing fields or for adding of the supplementary data about the form. A title appears every time you add a field to the form. To use it:
![]() Press the button
Press the button ![]() .
.
![]() Click on the form where you want to place the title.
Click on the form where you want to place the title.
![]() Write
the text of your choice.
Write
the text of your choice.
Add a " area of text " or an independent field 
As for the queries, you may add calculated fields from the other data in a form or a report. So, you can carry out calculations directly in the form with a area of text (i.e. field). For example, the total of an invoice would look like this: = [ SousTotalProduits] + [ SousTotalServices] + [Taxes]. The only difference enters a area of text containing a field of a calculated field is that you must put the character "=" at the beginning of the formula.
The next part consists in adding a calculated field that calculates the total of incomes ( salary+commission ) from employees. The exercise consists in adding a area of text to the form to determine the income (salary and commission) from the employee shown in the screen.
![]() Press the button
Press the button ![]() to
add a area of text.
to
add a area of text.
![]() Click
in the place where you want the independent field.
Click
in the place where you want the independent field.
The area of text and the title will appear.
![]() Place
the cursor inside the box of area of text.
Place
the cursor inside the box of area of text.
![]() Enter
the following formula: = [salary] + [commission]).
Enter
the following formula: = [salary] + [commission]).
![]() Show the form
in Form mode by pressing on the button
Show the form
in Form mode by pressing on the button ![]() .
.
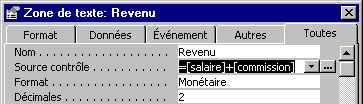
If the returned field shows *Nom? There is an error in the formula. watch to return to the Design view and to verify the formula.
![]() enter a number
the box salary or commission and press the Enter key.
enter a number
the box salary or commission and press the Enter key.
As soon as you have, press the Enter key, or move the cursor in another field, Returned independent field that you have just created updated with the new total of the sum fields Salary and Commission.
You can create your own Formulas to calculate almost anything. You can calculate the GST and the TVQ on an invoice, the commission of a salesperson on an invoice or use the functions of Access for the other calculations. In fact, you should use a calculated field in a query, a form or a report in every occasion that you have.
Add a group of options 
A group of options allows you, as for the area of modifiable list and the area of list, to choose among a predetermined list. One of the differences between a group of options and is both others that all the options appear to the screen. For both others, you must press a button in the right-hand side of the box to see the other possibilities. Another difference is that you should write the description, called a label in Access's jargon, instead of choosing among a list that meets itself in a table or a query. The last difference is that you must determine the value that will be kept in the field for each of the labels that you wrote.
The exercise consists in creating a group of options that serves for determining the social status of the employee. The value that will be chosen will be kept in the field Status of the Employees table.
![]() Press the
button
Press the
button ![]() .
.
![]() Click on the form
in the place where you want to put a group of options.
Click on the form
in the place where you want to put a group of options.
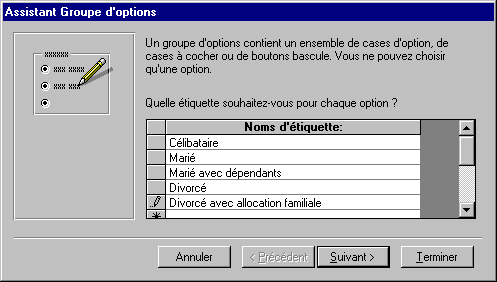
In the first window, the assistant of group of options will ask you for the list of labels, or descriptions, for the choices that you want to offer to the user of the form.
![]() Write then
the list of the possibilities. For this exercise, write the same labels, or
descriptions, as those shown in the window above.
Write then
the list of the possibilities. For this exercise, write the same labels, or
descriptions, as those shown in the window above.
![]() Press the Next button.
Press the Next button.
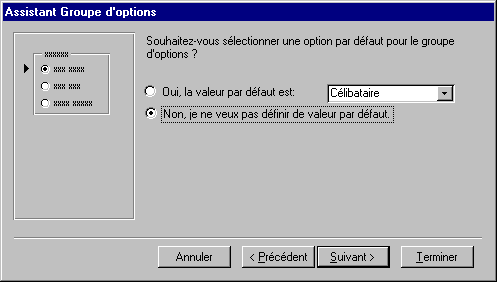
The assistant for the group of options asks you then if one of the values should be the value by default. What means that there would be a predetermined value. If no other value is chosen, it's the one that will be the value of the field.
![]() For this exercise,
select the option: " No, I don't want to define of value by default. "
For this exercise,
select the option: " No, I don't want to define of value by default. "
![]() Press the Next button.
Press the Next button.
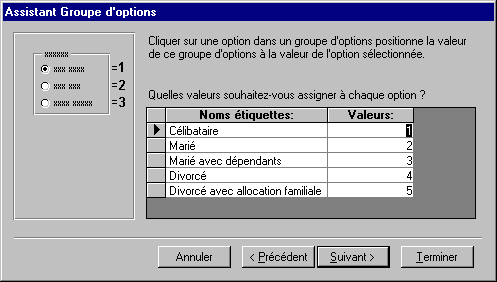
Having entered labels, you must give a value to each of these. By default, Access shows a number next to each of these labels. It's also possible to you to put of the text instead of figures. This window allows you to change these values to those of your choice.
![]() For
this exercise, leave the values to those shown initially in the window.
For
this exercise, leave the values to those shown initially in the window.
![]() Press the Next button.
Press the Next button.
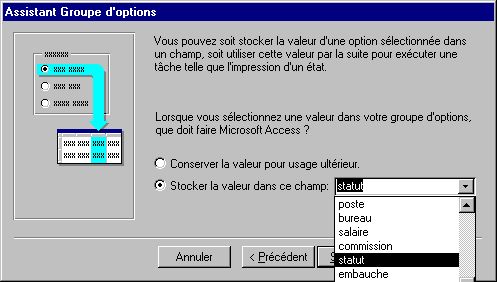
The assistant asks you then that to make with the selected value. It offers to save it in an independent field (to save the value for a later user) or to place this value in a field of a table.
![]() For this exercise,
select the option " Store the value in this field: " and select
the field Status.
For this exercise,
select the option " Store the value in this field: " and select
the field Status.
![]() Press the Next button.
Press the Next button.
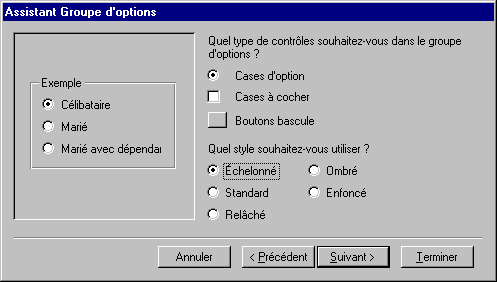
The assistant asks you then of the data about the style of presentation of the group of options that you prefer. It offers you the choice for the presentation of labels (descriptions) and of the border that surrounds the group. The left part of the window offers you a preview of the group of options with your choices of options.
![]() For this exercise,
select the option " Compartment of option " for the presentation of labels.
For this exercise,
select the option " Compartment of option " for the presentation of labels.
![]() Select the option "Spread out" for the choice of the border.
Select the option "Spread out" for the choice of the border.
![]() Press the Next button.
Press the Next button.
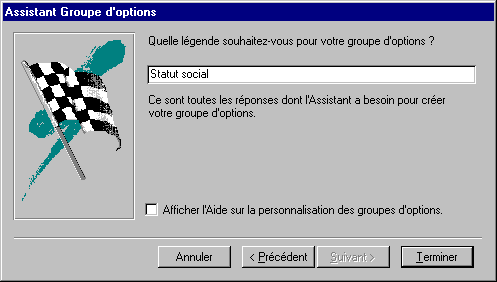
The last element that the assistant needs to end the creation of the group is the title for the group of options. This title will appear at the top of the group of options. For this exercise:
![]() Write the text
following in the box: social Status.
Write the text
following in the box: social Status.
![]() Press the Finish button.
Press the Finish button.
Access will take a moment to generate the group of options with the options that you chose. Here is the result of the exercise.
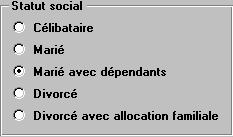
With a group of options, it's only possible to choose one of the choices offered in the box at the same moment. How in this example, it's impossible to be unmarried and married at the same time!
Toggle Button |
The Toggle button, like the check box button, are used for Yes/No fields. You press the button to say "yes" or "to activate" the option or the field. |
Option/Radio button |
The Option button(formerly called radio button) can be used with a field of type Yes/No. It's necessary "to darken" the button to activate it or to say the equivalent of Yes. |
Checkbox |
The check box can be used with a field of type Yes/No. It's necessary to makee "X" in the box to activate it or say the equivalent of Yes. |
Zone of modifiable list 
As a group of options and a area of list, a area of modifiable list allows you to select a value among a predetermined list. It's also possible to you to add the other values to the so necessary list. It's an element that group of options and the area of list does not allow you. A list has also the advantage to avoid errors of spelling during the retranscription of the data. The last advantage of a modifiable list is that you may show several fields at the same time. This has the advantage to give a better reference at the time of choosing for a value of the list.
The exercise consists in creating a area of modifiable list for the field office that represents the office location of the employees. The source of the modifiable list will be the table office that contains the name of cities as well as the addresses of each of the offices(desks) of the company.
![]() From the form, select the field office and erase it.
From the form, select the field office and erase it.
![]() From the toolbar, press the button
From the toolbar, press the button ![]() .
.
![]() Place
the area of modifiable list by clicking in the place where the field office was located.
Place
the area of modifiable list by clicking in the place where the field office was located.
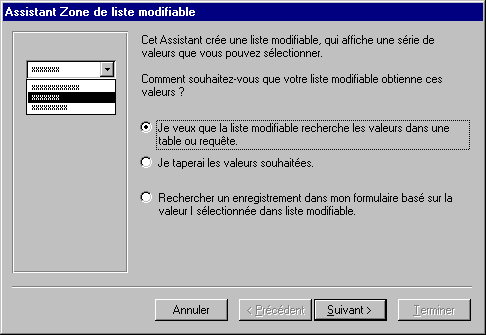
The assistant offers you three ways to determine the source for the modifiable list. Among choices to determine the source, you can choose the contents of a table or a query. You can also write the values of your choice. These will be then kept in a new table. The last possibility allows you to go to a record according to the choice of this modifiable list.
![]() For
this exercise, select the first option: I want that the modifiable list looks
for...
For
this exercise, select the first option: I want that the modifiable list looks
for...
![]() Press the Next button.
Press the Next button.
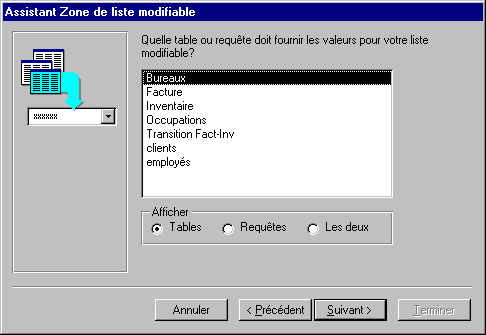
The assistant will ask you for the name of the table or the query that will be used for the source of the modifiable area. It shows you even the list of these.
![]() For
this exercise, select the table office.
For
this exercise, select the table office.
![]() Press the Next button.
Press the Next button.
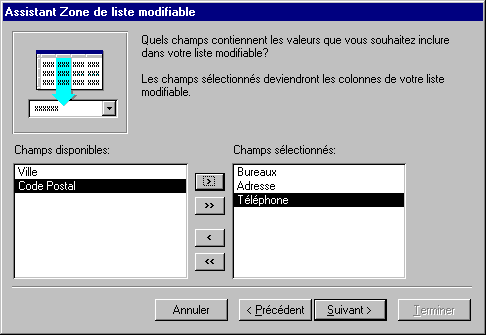
The following window asks you to choose from the list of the fields of the query those that you want to show in the screen. These give you a supplementary reference during the selection of the value of the modifiable list. Fields will be shown according to the order that they you will find in the box " selected Fields ".
![]() For
this exercise, select in the order the following fields: Offices(desks), Address, Telephone.
For
this exercise, select in the order the following fields: Offices(desks), Address, Telephone.
![]() Press the Next button.
Press the Next button.
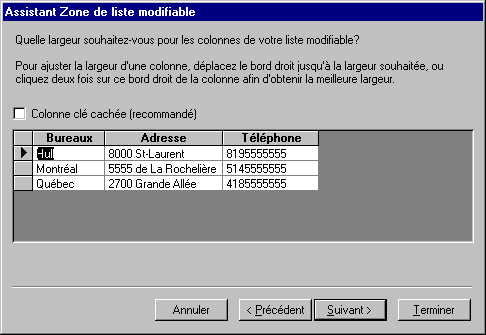
The next window asks you to determine the width of each of the columns of the fields that you selected in the previous window. It's this width that will be used when it will be the time to show the modifiable list. So, this window allows you to show or to hide the key column; the first selected in the previous window. For this case, it's about the field Offices(desks).
![]() For
this exercise, deactivate the option hidden key Column.
For
this exercise, deactivate the option hidden key Column.
To adjust the width of columns:
It's intéssant to be capable of adjusting the width of columns containing of the data. You can make sure that all the data of the field appears in the box.
![]() Place
the cursor at the end of the column or between two columns.
Place
the cursor at the end of the column or between two columns.
![]() Press and hold the left mouse button and move this one towards the left or to the right to reduce or widen the column.
Press and hold the left mouse button and move this one towards the left or to the right to reduce or widen the column.
![]() For
this exercise, adjust the width of columns to show all the contents of these.
For
this exercise, adjust the width of columns to show all the contents of these.
![]() Press the Next button.
Press the Next button.
If there are only two fields in the list of the available fields:
![]() Press the Previous button.
Press the Previous button.
![]() deactivate the option of hidden key column.
deactivate the option of hidden key column.
![]() Press e Next button.
Press e Next button.
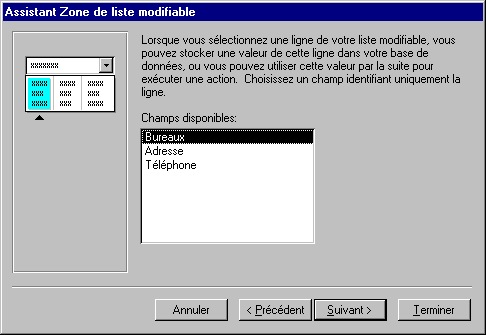
Because you chose several fields in the posting, the assistant would like to know the value of that field he should save in the modifiable area.
![]() For
this exercise, select the field Offices(desks).
For
this exercise, select the field Offices(desks).
![]() Press the Next button.
Press the Next button.
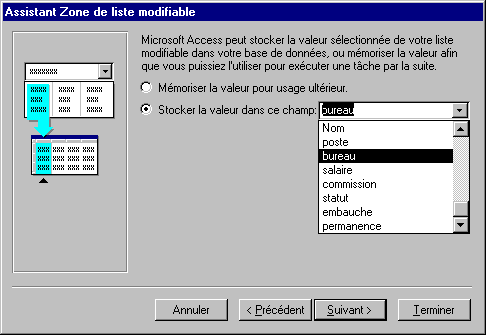
The assistant asks you then for the place where you want to save the datum. You can save it in an independent field (Remember the value for later use) or put it in one of the fields of the table.
![]() For
this exercise, store the date in the field office.
For
this exercise, store the date in the field office.
![]() Press the Next button.
Press the Next button.
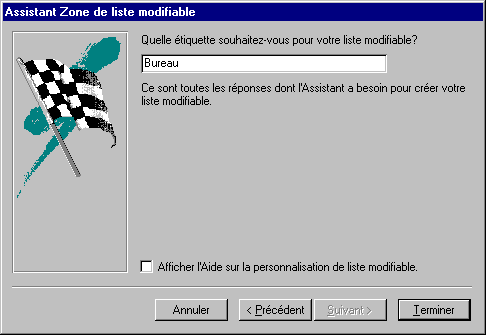
The last question is to know that is the text of the label that will describe the modifiable list.
![]() For
this exercise, write "Office("desk") in the box.
For
this exercise, write "Office("desk") in the box.
![]() Press the Finish button.
Press the Finish button.
Here is a preview of the modifiable list ended time.

Zone of list 
A area of list offers to the user of the form a choice of certain values for a field. The exercise that follows consists in creating a area of list and to show a list for the possible activities(occupations) in the company.
![]() Press the button Bums around of list
Press the button Bums around of list ![]() .
.
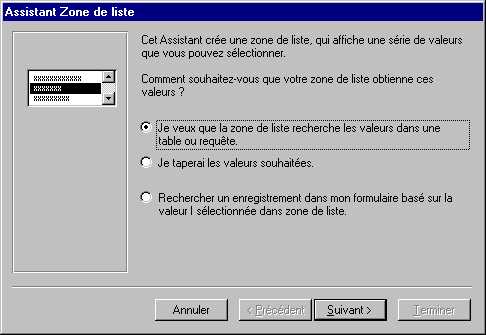
In this database, there is a table that contains the list of the activities(occupations) of the company. This table is called moreover Activities(occupations). You can also create your own list by selecting the option " I would type the wished values. "
![]() For
this exercise, select the first option: I want that the area of list looks
for the values in a table or the query.
For
this exercise, select the first option: I want that the area of list looks
for the values in a table or the query.
![]() Press the Next button.
Press the Next button.
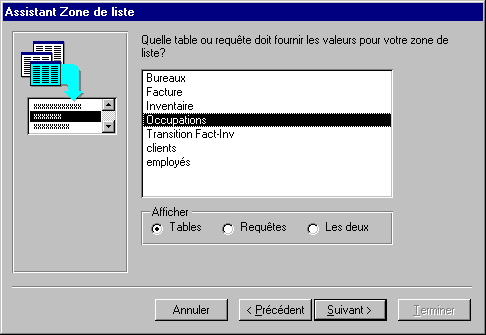
Access will ask you for the name of the table or the query that contains the field with the data to be put in the area of list. Of the list of tables and queries of the database, select the one that contains the data that you want to show in the area of list.
![]() For
this exercise, select the table Activities(occupations).
For
this exercise, select the table Activities(occupations).
![]() Press the Next button.
Press the Next button.
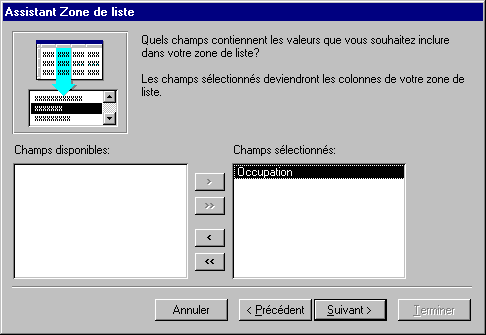
The table contains that a single field: Activity(occupation). In this table, there is at present that two possible activities(occupations): manager and salesperson. If you wanted to add another Poste to the list, it would be necessary to add a record to this table. Contrary to a area of modifiable list, it's impossible to add a record directly in the area of list.
There is also another table that would have been able to be chosen. It's the table Employees. There is in this one the field posts that already contains a list of the activities(occupations) of the employees. But, in most of the boxes, you'll want to use the data resulting from another table.
![]() Select
the field Occupation.
Select
the field Occupation.
![]() Press the button
Press the button ![]() to
transfer the Occupation field in the area of the selected Fields.
to
transfer the Occupation field in the area of the selected Fields.
![]() Press the Next button.
Press the Next button.
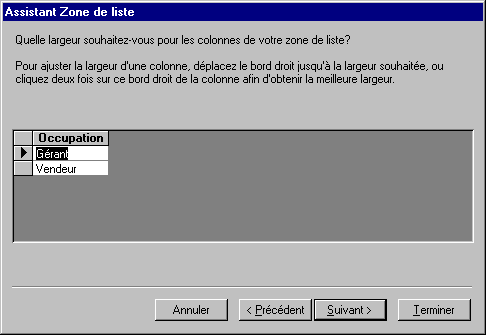
The assistant of the area of list asks you then to determine the length the field that will be shown in the screen.
![]() Place
the cursor on the right border of the box.
Place
the cursor on the right border of the box.
![]() Press and hold the left mouse button and move the mouse towards the left or the right-hand
side as you want to reduce or to enlarge the width the length the window.
Press and hold the left mouse button and move the mouse towards the left or the right-hand
side as you want to reduce or to enlarge the width the length the window.
![]() Once you determined the wanted width, release the mouse button.
Once you determined the wanted width, release the mouse button.
![]() Press the Next button.
Press the Next button.
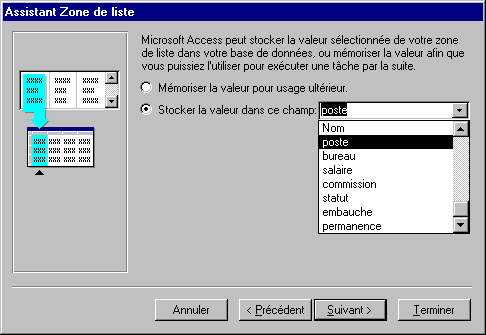
The front last stage consists in indicating to the assistant of the area of list if you want to save choices in a value for later custom(usage) or among one of the fields that meets itself in the form. For the exercise, the value chosen by the area of list will go to the field Poste.
![]() Select
the second option: Store the value in this field.
Select
the second option: Store the value in this field.
![]() From the
list of the available fields, select the field Poste.
From the
list of the available fields, select the field Poste.
![]() Press the Next button.
Press the Next button.
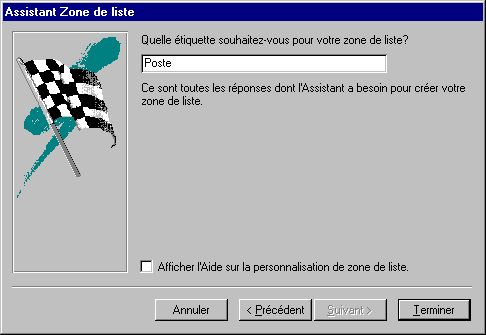
The last stage consists in writing the text that will go with the area of list.
![]() Write
in the box of the label: "Post("post office").
Write
in the box of the label: "Post("post office").
![]() Press the Finish button.
Press the Finish button.
![]()
Command button 
Command buttons are very practical for the users of forms. They allow easily to reach options that affect the form or the database. For example, graces(favours) in the buttons of command, you may cross(spend) from a record to another, to open or to print a form or a report as well as several other possibilities. Access offers a series of options predetermined to facilitate the creation of buttons of command. If, these don't answer your needs, you can always create a macro or a module and " to attach it " to a button.
The next exercise consists in the creation of a button instructions to pass in the following record.
![]() From
the toolbar, click the command button
From
the toolbar, click the command button ![]() .
.
The assistant for the command button will show the following window.

This first window asks for action button you wish for. The first column is the categories of possible actions. The second column shows the possible actions. For the exercise, the button should show the following record:
![]() From the column Categories, select the option Movements among enreg.
From the column Categories, select the option Movements among enreg.
![]() From the
column Actions, select the option following Record.
From the
column Actions, select the option following Record.
![]() Press the Next button.
Press the Next button.

The next window asks you for that kind of presentation, want on the button. Is it of the text of your choice or a representative picture? If you want of the text, it's enough to write the text in the first box and to choose the option Text. For the exercise, an picture will be used.
![]() Click on the option Embellishes with pictures.
Click on the option Embellishes with pictures.
![]() From the
list of the possible pictures, select the Next picture.
From the
list of the possible pictures, select the Next picture.
There are also two other interesting options on this window. By clicking the option " Show all the pictures ", you'll have more possibilities to choose an picture. Even with this list, it's still possible that there is no picture that answers your needs. It's so possible, with the button To cross(go through) to fetch an picture that you found moreover and to paste it on the button.
![]() Press the Next button.
Press the Next button.
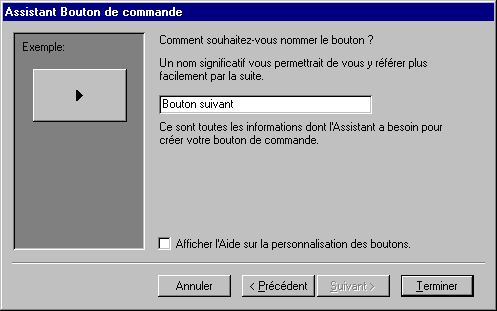
The last window asks you for that name, want to give to the control command button.
![]() In
the box, write the text " following Button ".
In
the box, write the text " following Button ".
![]() Press the Finish button.
Press the Finish button.
Image 
It's also possible to insert pictures into a form. That it's the logo of the company or a representative picture.
![]() From the toolbar, click the button of picture
From the toolbar, click the button of picture ![]() .
.
A cursor with the following format ![]() will appear. It's enough to place it on the form in the place where you
want to insert the picture.
will appear. It's enough to place it on the form in the place where you
want to insert the picture.
![]() Place
the cursor on the form and click the mouse button.
Place
the cursor on the form and click the mouse button.
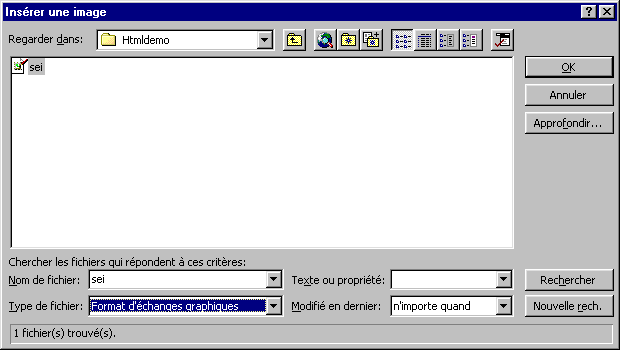
Access will ask you for the endoit and for the name of the picture that you want to insert.
![]() Select
the place and the picture of your choice.
Select
the place and the picture of your choice.
![]() Press the OK button.
Press the OK button.
The picture will fit on the form. You can always move it on the form. According to the size(format) of the picture, it's possible that you can not change the size. It's a thing to consider when you create the pictures for your forms or your reports.
Independent Frame object 
Allows to insert objects resulting from the other Windows applications such as a chart of Excel or an organization chart of Visio or the other applications. The object is indépendnant of the contents of Access's tables.
Dependent Frame object 
The inserted object is dependent on the contents of tales or Acceess's queries. A modification of these could affect the dependent object.
Page break 
Even in a form, you may put page breaks. It has no effect in the view in the screen. But, this option is very practical at the time of the printing of the form. It allows to print a form on several pages.
![]() From
the toolbar, press page break button
From
the toolbar, press page break button ![]() .
.
![]() Move
the cursor at the footer of the Details area.
Move
the cursor at the footer of the Details area.
![]() Press
the left mouse button.
Press
the left mouse button.
A small control ![]() will seem stuck on the left border of the window. This is the separator
of page. All that is above this control will be on a page. The
rest will be printed on another page.
will seem stuck on the left border of the window. This is the separator
of page. All that is above this control will be on a page. The
rest will be printed on another page.
To see the effect of this control, it's first necessary to move it in the middle of the form.
![]() Click on the control of the separator of page.
Click on the control of the separator of page.
![]() Press and hold the left mouse button and move the control in the middle of the form.
Press and hold the left mouse button and move the control in the middle of the form.
The separator is automatically going to paste to the left border of the form.
![]() Press
the
Press
the ![]() button
.
button
.
You will see a preview of your form if it was printed on paper. You see only also a part of your form. The rest is on the following page.
![]() Press
the
Press
the ![]() button
located in the left lower corner of the screen.
button
located in the left lower corner of the screen.
The following page will appear to the screen. You go to notice that the rest of the form will appear on the paper. But, also, you go to see the beginning of a form for the following record. It's for that reason, for be
Care of printing that page breaks are put in it any end of the area Detail of the form; to have two forms on the same paper.
Control Tab 
The control Tab offers two advantages. It groups together(includes) the data in the same place and sets less(fewer) of space in the screen. It's enough to click the tab to see the data of the chosen category.
Sub form / Sub Report 
Very practical to make complex forms the data of that result from several connected tables. It's however necessary to pay attention that there are "formal" relations between tables.
Line
Serves for separating the various sections of a form. Helps at a better reading and understanding of the form.
Box 
Allows to frame of the text or one or several fields. Only for needs of presentation.
The other controls 
 |
There are several other controls that are available.
You will find a list of all the other objects that you can add. Some you already know, other that you never imagined existed or accesible. |
Change the properties of a field or of an object. 
![]() Select
the object, or the control, that you want to change an attribute.
Select
the object, or the control, that you want to change an attribute.
![]() Press
the button
Press
the button ![]() on
the toolbar.
on
the toolbar.
OR
![]() Press the right mouse button.
Press the right mouse button.
![]() From the context menu, select the Properties option.
From the context menu, select the Properties option.
 |
Here is the list of all the properties or options that you can modify for each of the "controls" of the form. The properties can be grouped together in 4 categories: Format, Data, Évennement and the Others. The most important option is the second of the list: Source controls. Access can know if the contents are a field of a query or a table. It's also possible to enter it a formula. |
Lock a field
At times, you want a user to view the information but not being able to change it. You need to change the values of two properties to make sure the content of the field will not be changed.
![]()
Mask a field
Sometimes, you need to mask un control so that the user doesn't see but still use it in the background. For example, the user doesn't need to see a calculated fields with the result of a ratio. This control will remain visible in Design view.
![]() Select
l'objet, ou le contrôle, que vous want to mask.
Select
l'objet, ou le contrôle, que vous want to mask.
![]() Appuyez
sur le button
Appuyez
sur le button ![]() sur la barre d'outils.
sur la barre d'outils.
OR
![]() Press the right mouse button.
Press the right mouse button.
![]() From the contextual menu, select the Properties.
From the contextual menu, select the Properties.
![]() Change
the property Visible à Non.
Change
the property Visible à Non.
The users will not seen the field on the form. Mais the form can still use this invisible field.
Put a page break
Only practical for the printing of the form.
The automatic format
Access allows you to change the presentation of your form by using a preestablished model.
![]() Press the
Press the ![]() button.
button.
The following dialog box will appear.
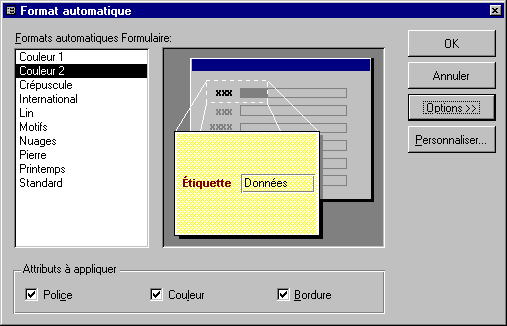
This window allows you to use one of the existing models as well as to decide to affect these changes to fonts, to colors of the text and the borders.
![]() For this exercise,
select the Colour option 2 from all the attributes.
For this exercise,
select the Colour option 2 from all the attributes.
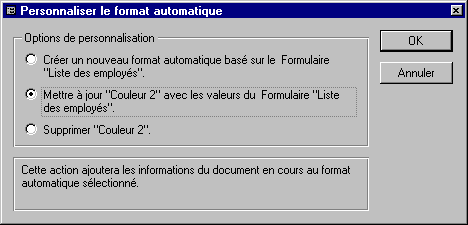
The assistant of automatic size(format) offers you three options: to create a new size(format) based on the current values of the Form option of Colour 2 Lists employees, to update the form with or to delete the Colour model 2.
![]() For this exercise,
select the second option (Update Colour 2).
For this exercise,
select the second option (Update Colour 2).
![]() Press the OK button.
Press the OK button.
Access will take a moment to update the presentation of the form.
The button to generate 
Update a Formulas, add functions, a macro or a programming module.
![]() Press the button
Press the button ![]() .
.
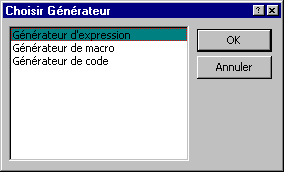
Access the choice offers you to reach the expression generator, the macro generator or the code generator.
Preview a form 
![]() From
the Design view, press the
From
the Design view, press the ![]() button.
button.
OR
![]() From
the Edit menu, select the option Previw a form.
From
the Edit menu, select the option Previw a form.
Tab order
The order of tabulation allows you to determine the order in that the cursor will pass from a field to another on the form. It's possible to you to change it to allow you better to meet the needs of the form. For this example, the field Poste should be below the field Name. Here is how to move it.
![]() From
the Edit menu, select theTab Order option.
From
the Edit menu, select theTab Order option.
The screen that is shown gives you the list of the fields that meets itself on the form in the order that the cursor passes from a field to another.
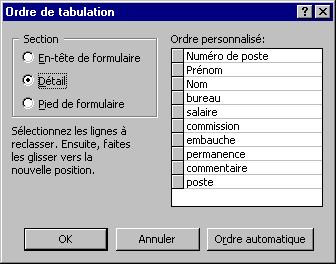
![]() Click
on the small grey box at the left of the field Poste.
Click
on the small grey box at the left of the field Poste.
![]() Press and hold the left mouse button and move the field below the field Name.
Press and hold the left mouse button and move the field below the field Name.
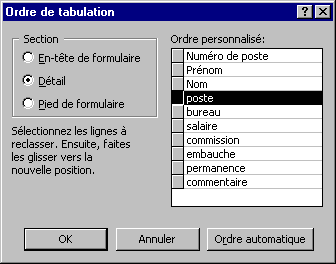
![]() When
the field is at the right place, you can release the mouse button.
When
the field is at the right place, you can release the mouse button.
The Automatic Order button can automatically order the fields. Access orders fields according to their place on the form: from left to right and top to bottom. So, the field the closest to the upper left corner of the form will be the first field where the cursor will stop, that in its right-hand side the second etc.
But it's can be not what you with need. imagine that you have on your form three "areas", personal data, salary and social advantages for example. It's very possible to have these areas the one in quoted(esteemed) by another. So, the automatic order would not be for your advantage. It's for that reason that it's always possible to change the order of tabulation.
Print a form 
Be careful!
Because this is an example, don't print all the records. Print only the first page of the form. Otherwise, all the records will be printed in the form of a form. You can also change the pagination of the document by using the File menu and Page setup.
![]() From the File menu, select the Print option.
From the File menu, select the Print option.
OR
![]() Press the
Press the![]() button.
button.
| You like what you read?
Share it with your friends. |